
How to Set Up a SOCKS Proxy on a VPS - for Security and Anonymity
Do you want to enhance your security and anonymity when accessing the internet? Setting up a SOCKS Proxy on a VPS (Virtual Private Server) is an excellent solution. With a SOCKS Proxy on your VPS, you can have full control over your proxy, bypass firewalls, and access the internet more securely. This article will guide you through the detailed steps to set up a SOCKS Proxy on a VPS, specifically using Shadowsocks, a popular SOCKS5 proxy software.

Why Set Up a SOCKS Proxy on a VPS?
- Full Control: You manage and configure your own proxy server.
- Higher Security: VPSs are typically located in secure data centers, which enhances the security of your proxy.
- Flexibility: A VPS can be used for many other purposes besides a proxy, such as hosting websites, applications, etc.
- Bypass Firewalls and Censorship: A SOCKS proxy helps you easily bypass internet censorship and access blocked content.
- Affordable: VPS providers offer various plans with prices suitable for a wide range of users.
Steps to Set Up a SOCKS Proxy (Shadowsocks) on a VPS
In this guide, we will use Shadowsocks, a lightweight, secure, open-source SOCKS5 proxy, and install it on a VPS running the Ubuntu Server operating system. The steps may be similar for other Linux distributions.
Step 1: Rent a VPS and Connect to It
- Rent a VPS: Choose a reputable VPS provider like DigitalOcean, Vultr, Linode, AWS, or Google Cloud. Select a VPS plan with the Ubuntu Server operating system (the latest version is recommended).
- Connect to the VPS via SSH: Use an SSH client like PuTTY (Windows) or Terminal (macOS/Linux) to connect to your VPS. You will need the VPS IP address, SSH port (usually 22), and login credentials (username and password or SSH key) provided by your VPS provider.
Important Note: Make sure you change the default password of your VPS after the first login to enhance security.
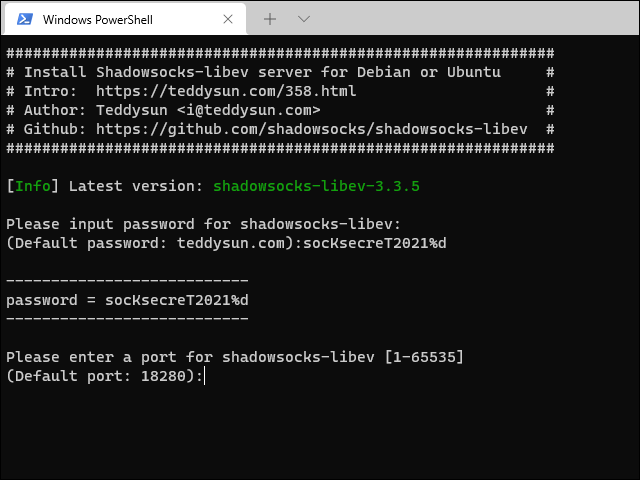
Step 2: Install the Shadowsocks Server
After successfully connecting to your VPS via SSH, run the following commands to install the Shadowsocks server:
sudo apt update
sudo apt install shadowsocks-libev
The sudo apt update command updates the package list, and sudo apt install shadowsocks-libev installs the Shadowsocks server from Ubuntu's software repository.
Step 3: Configure the Shadowsocks Server
Create or edit the Shadowsocks server's configuration file. The file is usually located at /etc/shadowsocks-libev/config.json. You can use a text editor like nano or vim to edit it:
sudo nano /etc/shadowsocks-libev/config.jsonAdd or edit the file content to look like the following:
{
    "server":"0.0.0.0",
    "server_port":8388,
    "local_address":"127.0.0.1",
    "local_port":1080,
    "password":"YOUR_PASSWORD", // Replace with your strong password
    "timeout":300,
    "method":"aes-256-gcm" // Encryption method (recommended)
}
Note:
- Replace
"YOUR_PASSWORD"with your own strong and unique password. - You can customize the
"server_port"(e.g.,8388) and"local_port"(e.g.,1080). Choose a port number greater than 1024 to avoid conflicts with other system services. "method":"aes-256-gcm"is the AES-256-GCM encryption method, which is recommended for its good security and performance. You can find other encryption methods here.
After editing, press Ctrl+X, then Y to save, and Enter to exit the nano editor.
Step 4: Start and Enable the Shadowsocks Server
Start the Shadowsocks server and configure it to start automatically when the VPS reboots:
sudo systemctl start shadowsocks-libev
sudo systemctl enable shadowsocks-libev
Step 5: Check the Shadowsocks Server Status
Check if the Shadowsocks server is running successfully with the command:
sudo systemctl status shadowsocks-libevIf you see a green active (running) text, it means the Shadowsocks server is running successfully.
Step 6: Get Your SOCKS5 Proxy Information
You will need the following information to configure the SOCKS5 proxy in your browser, application, or system:
- Server Address: Your VPS's public IP address. You can find this in your VPS provider's control panel or by running the command
curl ifconfig.meon your VPS. - Port: The port you configured for the Shadowsocks server (e.g.,
8388in theconfig.jsonfile). - Password: The password you configured in the
config.jsonfile (YOUR_PASSWORD). - Encryption Method: The encryption method you configured (e.g.,
aes-256-gcm).
Using Your Newly Created SOCKS5 Proxy
Once you have the SOCKS5 proxy information, you can configure it in your web browser, application, or operating system.
For example, in Chrome or Firefox, you can go to the proxy settings and choose the SOCKS5 configuration, then enter the server, port, password, and encryption method information.
Conclusion
Congratulations on successfully setting up a SOCKS Proxy on your VPS! You can now enjoy a more secure, private, and unrestricted internet connection. Remember to use your proxy responsibly and in compliance with the law.
If you have any questions during the setup process, feel free to leave a comment below. Don't forget to share this article if you found it helpful!
ReplyDeleteHoàng Quân Agency - Học viện trao đổi, chia sẻ kinh nghiệm về kinh doanh thời đại công nghệ số.